Brake Calipers Buying Guide: How to Choose the Right One
Brake calipers are not just metal housings around the pads. They have to clamp evenly, release cleanly, seal brake fluid, clear the wheel, and match the vehicle side without creating noise or drag.
This guide explains how to choose a caliper by fit evidence, hydraulic layout, included hardware, corrosion exposure, and repair risk so you can avoid returns, repeat labor, and unsafe shortcuts.
Buying framework
How to think about buying brake calipers
A good caliper purchase starts with the failed corner, then works outward to the brake system around it.
Identify the failure mode: Separate a leaking piston seal, frozen slide pin, seized bracket, torn boot, hose restriction, or pad-wear issue before assuming the caliper body is the only part to buy.
Confirm the side and brake package: Match left or right orientation, axle location, bracket casting, hose connection, bleeder placement, piston setup, and parking-brake hardware before price enters the decision.
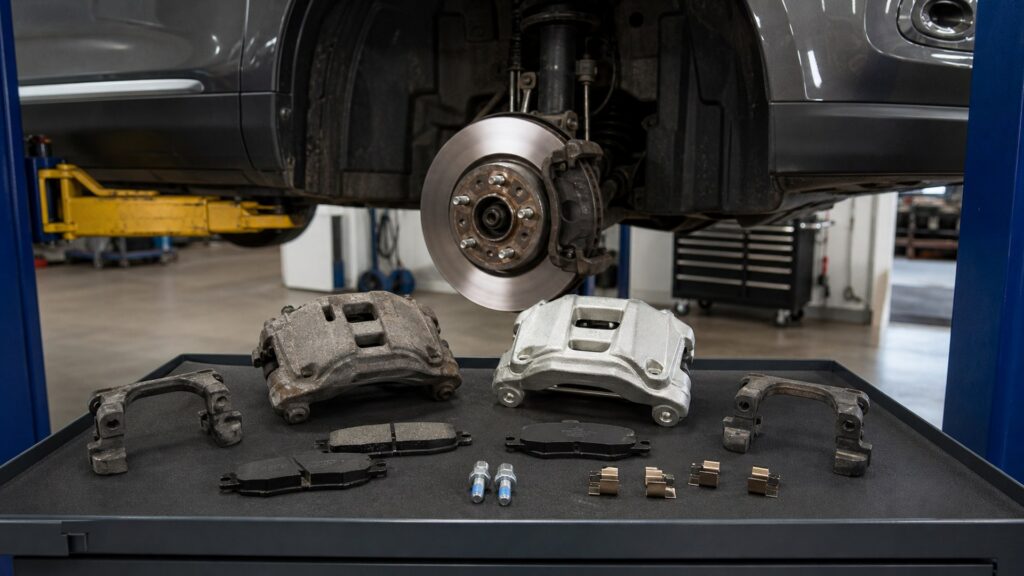
Choose bare, semi-loaded, or loaded: A bare caliper may be enough for a clean late-model repair; a semi-loaded or loaded unit can be smarter when brackets, pins, clips, or pads are already suspect.
Plan the fluid and hardware work: Caliper replacement can require fresh crush washers, bleeding, torque checks, bedding, and inspection of hoses, rotors, and pads.
Weigh downtime and core handling: Shipping speed, return windows, core charges, and warranty process matter because the vehicle may be immobile once the old caliper is removed.
Who this is for
Match brake calipers to the vehicle, repair goal, and buyer situation
Different buyers should prioritize different risks in the same caliper category.
Simple leak repair: Choose an exact-match caliper with the right hose seat, bleeder location, and fresh seals; do not pay extra for features that do not affect the failed corner.
Frozen or uneven pad wear: Look harder at bracket inclusion, slide hardware, and pad contact surfaces because a piston-only replacement may leave the real cause in place.
Rust-belt vehicle: Favor coated housings, new brackets, fresh pins, and clear core rules when corrosion is the reason the old caliper stopped releasing.
DIY driveway repair: Prioritize complete contents, clear photos, and easy pre-install comparison so the vehicle is not stranded while small hardware is missing.
Shop estimate reviewer: Ask whether the quote includes calipers only, brackets, pads, rotors, hoses, brake fluid, bleeding, and labor warranty.
What to pay attention to
Which brake caliper specs actually matter
The useful specs are the ones that affect sealing, release, and install confidence.
Feel specs
A good caliper choice shows up as a firm pedal, clean release, quiet pad movement, and no pull or hot-wheel smell after the first drive.
Capability specs
For ordinary replacements, focus on piston design, seal quality, bracket condition, coating, hardware completeness, and whether the part can be bled without awkward access.
Hydraulic layout: Check piston count, piston material, seal design, hose connection, bleeder access, and crush-washer requirements before installation.
Mounting and clearance: Verify bracket ears, slide-pin spacing, rotor diameter compatibility, wheel clearance, and parking-brake provisions where applicable.
Release behavior: Smooth slides, intact boots, clean bracket surfaces, and correct pad support help the caliper release instead of dragging or creating uneven wear.
Included contents: Compare bare calipers against semi-loaded and loaded assemblies by what they include: bracket, pins, clips, pads, seals, washers, and installation notes.
Surface protection: Coating quality, plated hardware, and corrosion resistance matter most in wet climates, salted roads, towing, and vehicles that sit for long periods.
Avoid these traps
Common mistakes people make when buying brake calipers
Most bad caliper purchases come from treating the caliper as separate from the brake corner.
Ignoring the hose: A restricted brake hose can mimic a sticking caliper. Replacing only the caliper may not fix drag if fluid cannot return properly.
Buying the wrong side: Left and right calipers can look similar until the bleeder, hose seat, or parking-brake lever points the wrong way.
Reusing corroded brackets: Old slide pins and brackets can ruin a new caliper by keeping the pads from moving freely.
Forgetting the core charge: A cheap listing may become less attractive once shipping, core return rules, and downtime are included.
Skipping the post-install check: Leaks, soft pedal feel, pad drag, hot wheels, or uneven contact after bleeding should be addressed before normal driving.
Decision guidance
Which type of brake caliper purchase is right for you
Choose the caliper package that removes the most repair risk for the vehicle in front of you.
Choose bare for clean, limited repairs: A bare caliper can work when the bracket, slides, pads, rotor, and hardware are known good and easy to reuse.
Choose semi-loaded for bracket risk: Semi-loaded assemblies are useful when slide pins, brackets, or small hardware caused the failure or may not survive removal.
Choose loaded for speed and completeness: Loaded calipers can reduce parts chasing, but confirm the included pads and hardware are appropriate for the axle and driving use.
Choose coated for corrosion exposure: A coated caliper and fresh hardware are worth considering when road salt, moisture, or long parking intervals killed the old part.
Delay the order when symptoms conflict: If drag, noise, or uneven wear could come from hoses, rotors, pads, or wheel bearings, inspect those pieces before buying.
Ownership & compatibility
What you are really buying into with brake calipers
The purchase continues through bleeding, bedding, core return, and early-use checks.
Keep install records: Save part numbers, axle side, mileage, core paperwork, and photos of the old and new calipers.
Bleed and verify carefully: Follow the proper bleed order, use fresh fluid when needed, and confirm the pedal firms up before road use.
Watch the first heat cycles: After initial driving, check for fluid seepage, hot wheel smell, dragging pads, uneven rotor marks, and abnormal noise.
Store warranty evidence: Receipts for hoses, pads, rotors, fluid, and related hardware can support a claim if the caliper is blamed later.
Plan paired work thoughtfully: Some vehicles do fine with one caliper; others benefit from paired axle service for consistent release and pad wear.
FAQ
Brake calipers buying guide FAQ
Quick answers for choosing a replacement caliper without overbuying.
Should I buy a loaded or unloaded brake caliper?
What is the first fit detail to check?
Do I need to replace both brake calipers?
Can a brake hose make a caliper seem bad?
How much should warranty influence the choice?
Bottom line
The simplest way to choose brake calipers
Choose the caliper that fits the brake corner and leaves the least unfinished repair risk.
Diagnose before ordering: Know whether the issue is leakage, sticking, corrosion, hardware wear, hose restriction, or a broader brake problem.
Match the physical layout: The right caliper has the correct side orientation, bracket geometry, hose seat, bleeder access, piston setup, and parking-brake detail.
Buy the right completeness level: Bare, semi-loaded, and loaded assemblies are different repair strategies, not just different prices.
Include the service work: Plan for washers, bleeding, fluid, torque, pad bedding, and a careful post-install inspection.
Final buying check: A good caliper purchase installs without improvisation, releases cleanly, seals reliably, and has support if the match proves wrong.
Reading Shortcuts
Jump to the sections that matter most for choosing brake calipers.
Decision Reminders
A quick checklist before you commit to brake calipers.
- Confirm the old part: Use the removed part, OE number, or service data to verify the catalog listing.
- Check included hardware: Missing clips, springs, seals, brackets, or fasteners can change the real cost.
- Inspect nearby wear: Do not expect a new brake caliper to solve problems caused by related components.
- Read warranty details: Know the claim process, exclusions, and whether labor is covered.
- Plan the install: Cleaning, torque, direction, bleeding, bedding, or adjustment steps matter after purchase.
Glossary Snippets
Quick translations for terms that confuse replacement-part buyers.
When to Use a Top 10 Review
Use this format when you want a faster way to narrow the field.
- You are early in the process: A Top 10 can separate common brake calipers by fitment confidence, completeness, and value.
- You want a shortlist: Ranked picks help organize budget, OE-style, complete-kit, and harsh-use options.
- You need category context: It is useful when you still need to understand the major choices before comparing two parts.
Already down to 2-3 options? A Comparison is usually faster than broad buying advice.
When to Use a Comparison
Ideal once you have a shortlist and need clear, practical tradeoffs.
- You narrowed it to 2-3 options: A comparison makes differences in fit notes, included hardware, warranty, and total repair cost easier to see.
- You are checking the quote: Side-by-side tradeoffs help determine whether a recommended part grade is justified.
- You are ready to decide: Use a comparison when the vehicle fit is known and the final choice is about value and risk.
Still exploring? Start with a Top 10 to identify the right brake caliper category first.