
How to Choose Cycling Gear for Safety & Visibility
Cycling visibility is a placement problem as much as a brightness problem. A strong rear light hidden by a coat, a headlight aimed poorly, or reflective material facing away from an approaching driver cannot do the intended job. Weather, intersections, curves, and moving traffic further change what others can notice.
Study the route from front, rear, and crossing angles, then build separate layers for seeing the path and being noticed. Follow local equipment laws, preserve helmet fit and bicycle control, and verify every mount with normal bags and clothing installed. No light or color guarantees that another person will see the rider, so visibility equipment complements attentive, predictable riding rather than replacing it.
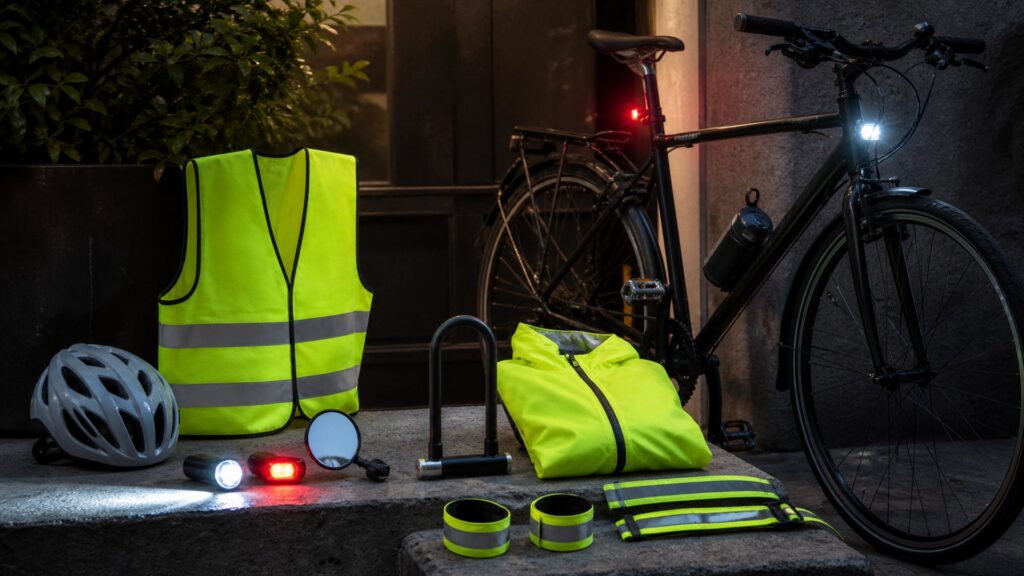
Buying framework
Build visibility around actual approach angles
Front, rear, and side conflicts require different equipment and placement. Begin with legal requirements and route geometry, then add redundancy where a single blocked or depleted device would matter.
Map who approaches from where: Mark overtaking traffic, driveways, side streets, roundabouts, trail crossings, curves, and dark stretches. Note whether people first see the bicycle from ahead, behind, or the side, and whether bags obscure that view.
Separate seeing from being seen: A headlight used to illuminate an unlit path needs a suitable beam and aim, while conspicuity lights signal the rider's presence. Some routes need both jobs; one maximum-output number cannot describe them.
Establish the legal baseline: Check current state and local rules for front lights, rear lights or reflectors, colors, modes, mounting, and required visibility. Use those requirements as the minimum rather than assuming advice from another jurisdiction applies.
Add passive and moving cues: Place fluorescent or high-contrast color for daytime conditions and retroreflective details where vehicle light can reach them after dark. Moving ankles or wheels may present different angles from a stationary vest or bag.
Protect operation and attention: Mount lights, mirrors, bells, and computers without crowding brake and shifter access. Controls should be understandable by touch when practical, and displays should not pull the rider's eyes away from the path.
Who this is for
Match the visibility system to the route
Daylight traffic, twilight commuting, unlit roads, wet weather, and group riding place different demands on beams, colors, angles, runtime, and backup equipment.
Daytime urban rider: Prioritize front, rear, and crossing-angle noticeability among visual clutter. Secure light placement, fluorescent or contrasting areas, and unobstructed movement cues matter more than simply covering every garment in one bright color.
Dawn, dusk, or night commuter: Use the legally required front and rear equipment, then compare beam purpose, runtime for both trip legs, side visibility, charge indication, and mounting that remains clear of work bags and outerwear.
Unlit-road or trail rider: Choose a front beam intended to reveal the surface at the speed traveled, plus rear or supplementary visibility where traffic is possible. Test aim, glare, runtime, backup, and control access in real darkness.
Rain or low-contrast rider: Wet lenses, spray, mist, dark clothing layers, and reflective road glare can alter visibility. Check weather protection, glove-friendly controls, lens cleaning, light aim, and whether rain gear covers reflective panels or rear lamps.
Group or family rider: Make each bicycle individually identifiable and visible without using modes that distract nearby riders. Check trailer, child-seat, cargo, and following-rider obstructions, and follow organizer or local requirements for group events.
What to pay attention to
Read light and reflective specifications in context
Useful details explain where light goes, from which angles it is visible, how long the chosen mode lasts, and whether the product remains mounted and operable in expected weather.
Headlight beam shape and aim: Compare the illuminated area, distance, edge spill, hotspot, and any cutoff for the surface and speed involved. Confirm the bracket holds its aim over vibration and does not direct excessive glare toward other road users.
Rear output and viewing angle: Inspect visibility from directly behind and from offset traffic positions with the rider seated. Compare steady and flashing modes where legal, usable runtime, lens shape, mount orientation, and obstruction by saddlebags, jackets, or cargo.
Side conspicuity: Look for reflective or active elements visible at intersections and driveways, not only parallel traffic. Pedal, ankle, wheel, frame, and clothing locations behave differently, so view the complete moving setup from both sides.
Battery and charge information: Compare runtime in the mode you will use, battery status clarity, charging connector, charging time, replaceable versus integrated power, low-charge behavior, and whether the device can support the full round trip plus delay.
Mount security and control space: Match clamp or strap range to the handlebar, seatpost, rack, helmet, or clothing location approved for the product. Check rotation, quick removal, theft exposure, cable interference, and room for hands on controls.
Color, fluorescence, and retroreflection: Bright or fluorescent materials can aid daytime noticeability, while retroreflective material returns incident light toward its source. Examine placement, covered area, viewing direction, garment movement, and care instructions rather than treating white fabric as nighttime equipment.
Avoid these traps
Avoid false confidence from one bright product
Visibility systems fail through poor aim, hidden lenses, dead batteries, missing side cues, or misuse of passive materials. Inspect the rider and loaded bicycle from outside the saddle.
Choosing only by maximum lumens: Maximum output does not describe beam pattern, aim, runtime, heat management, side spill, or the mode used most often. Select the light for its job and verify the projected beam in the intended setting.
Aiming a headlight by the handlebar: Handlebar angle is not beam aim. Load the bicycle, place it on level ground, follow the light maker's instructions, and inspect where useful illumination and glare fall at realistic riding distance.
Letting clothing or luggage hide the rear: Jackets, backpacks, saddle bags, child seats, and cargo can obscure rear lights and reflectors. Sit on the loaded bicycle and view it from several following and crossing positions before departure.
Using reflection as a light substitute: Retroreflective material needs an external light source and favorable angle. It may complement legally required active lighting but should not be assumed to replace it; check the rules for every location ridden.
Trusting last week's battery: A light can be present yet unavailable because it is depleted, dirty, loose, or in the wrong mode. Use a charge routine, inspect status indicators, and carry appropriate redundancy when darkness has serious consequences.
Decision guidance
Layer front, rear, and side visibility
Build from required equipment and the route's darkest or most complex sight line. Each layer should address a different angle or failure rather than duplicate the same bright patch.
Choose the front system: Decide whether the rider needs path illumination, forward conspicuity, or both. Match beam, mode, aim, runtime, weather resistance, and mount to speed and surroundings while following local color and operation rules.
Make the rear unmistakable: Use the required rear reflector or light configuration and add active visibility where appropriate. Position it high and clear enough for relevant traffic angles without allowing bags, coats, racks, or the rider's body to block it.
Cover crossing approaches: Add side-facing reflective or active details where intersections and driveways dominate risk. Inspect both sides with pedals moving and normal clothing fitted; a front or rear lens may offer little visibility at ninety degrees.
Preserve helmet fit and rider control: Select a compliant, properly fitted bicycle helmet before adding approved accessories that could change balance or position. Keep mirror, bell, and light controls clear of braking, shifting, steering, shoulder checks, and normal head movement.
Plan for depleted or failed equipment: Use charge indicators, a fixed charging location, and enough runtime for delay. Where darkness would leave the rider without compliant visibility, carry a suitable backup light or another realistic way to stop or exit.
Ownership & compatibility
Keep visibility equipment clean, aimed, and powered
A modest light that works is more useful than a powerful one with a slipping bracket or empty battery. Make inspection part of the ride preparation routine.
Charge by trip, not memory: Estimate the next ride's duration in the selected modes, inspect battery status, and recharge according to the product instructions. Periodically verify backup lights and power banks instead of assuming unused equipment remains ready.
Clean lenses and reflective surfaces: Remove road film, dust, and spray using methods suitable for the lens or textile. Inspect scratches, clouding, peeling reflective trim, covered panels, and grime that changes the visible area or beam.
Recheck mounts and aim: Confirm straps, clamps, rack brackets, helmet attachments, and clothing clips stay oriented over vibration. Repeat aim and obstruction checks after changing handlebars, seat height, bags, racks, jackets, or cargo.
Retire unreliable components: Follow manufacturer guidance for damaged batteries, cracked housings, failed seals, weak switches, intermittent charging, loose mounts, or deteriorated reflective garments. Do not depend on equipment that cannot hold mode, aim, or attachment.
FAQ
Cycling safety and visibility questions
These answers clarify illumination, conspicuity, reflectivity, helmet fit, mounting, and battery choices without promising that any product makes a rider impossible to miss.
Which cycling gear improves visibility most?
How bright should a bicycle headlight be?
Where should bicycle lights be mounted?
Is reflective clothing enough for riding after dark?
How should a bicycle helmet fit?
Can daytime running lights help cyclists?
Should a bicycle light flash or stay steady?
How often should visibility gear be checked?
When should bicycle lights be replaced?
Bottom line
Make every visibility layer earn an angle
A thoughtful system covers the path ahead, following traffic, and crossing approaches while preserving control. Keep it lawful, charged, correctly aimed, and free from luggage or clothing obstruction.
Inspect from outside: View the ridden and loaded bicycle from front, rear, and both sides instead of judging visibility from the saddle.
Use the planned mode: Test beam, glare, viewing angle, and runtime at the setting intended for the whole trip.
Prepare for failure: Give lights a charging home, inspect mounts and lenses, and carry an appropriate fallback where darkness would stop the ride.
Reading Shortcuts
Jump to sight-line planning, route profiles, light and reflective details, or visibility questions.
Decision Reminders
Inspect the complete bicycle and rider from the angles other road users actually occupy.
- Law: Verify current local light, reflector, color, mode, and mounting requirements.
- Aim: Direct useful light where intended while limiting glare and mount movement.
- Obstruction: Check bags, coats, racks, bodies, trailers, and cargo from several angles.
- Power: Use realistic mode runtime, visible charge status, and a consequence-based backup.
Glossary Snippets
Terms that distinguish seeing the route from helping other road users notice a cyclist.
When a Top 10 Helps
Use visibility rankings after separating illumination, forward noticeability, rear traffic, side approaches, legal requirements, and runtime.
- Angle filter: Remove products whose beam, lens, reflection, or mount does not address the approach direction that matters.
- Reliability filter: Compare aim retention, usable modes, battery status, weather exposure, control access, charging, cleaning, and replacement support.
A ranked light cannot know your local law, ambient lighting, approach angles, luggage obstruction, trip duration, or tolerance for glare.
When a Comparison Helps
Compare finalists on the same fully loaded bicycle and inspect them from traffic positions, not just across a specification table.
- What others receive: Compare front, rear, side, moving, and offset visibility with realistic clothing, cargo, weather, and background.
- What the rider manages: Compare controls, charge information, mounting, removal, glare, cable routing, cleaning, storage, and backup readiness.
The stronger visibility choice covers its assigned angle consistently without blocking controls or encouraging confidence beyond what the equipment can guarantee.