
Dash Opening Geometry
The visible aperture, trim contours, mounting points, bezel shape, and structural space available for the receiver and installation kit.
- Nominal size omits contours
- Brackets set final alignment
- Trim removal affects access
Head-unit fitment is a system match, not a measurement of the dashboard opening alone. The chassis and screen must clear trim, vents, controls, wiring, brackets, and internal structure, while the electrical side must connect power states, speakers or factory amplification, antennas, cameras, microphones, and vehicle-data functions correctly.
A receiver can bolt into place and still be a poor fit if it loses warning tones, clips a factory amplifier input, shows no camera image, blocks a vent, strains a harness, or cannot be removed for service. Fitment matters because physical, electrical, functional, ergonomic, and service boundaries all have to pass together.
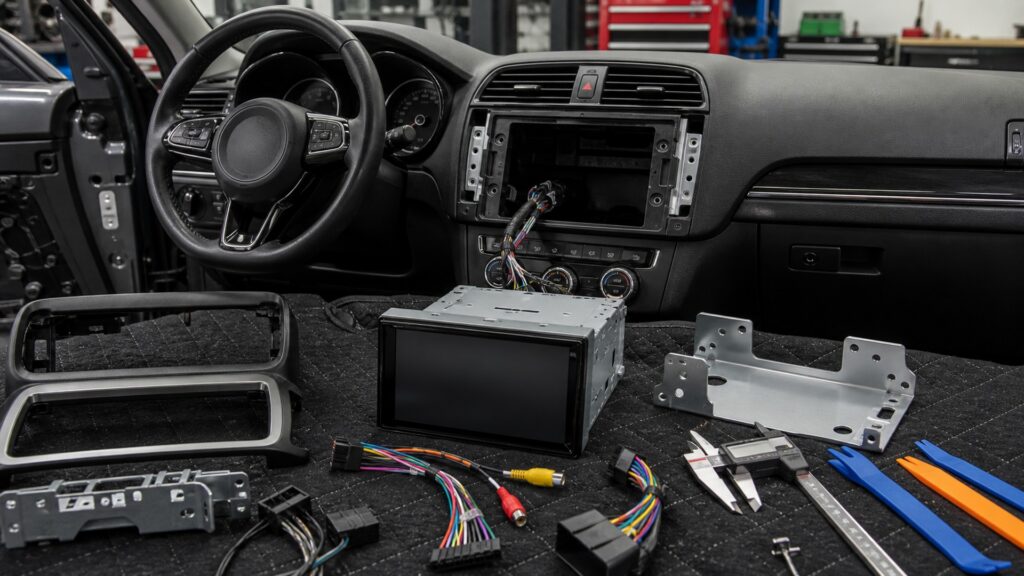
The receiver must match radio chassis depth, leave the floating display sweep clear, connect through the correct vehicle harness, communicate with the vehicle, retain required features, and remain serviceable without hidden strain.
Tip: Build the parts list from the exact vehicle, trim, factory-audio option, receiver model, and features to be retained—not from dashboard width alone.
The definitions separate nominal size from the mechanical, electrical, data, accessory, and human fit that decides the finished installation.
The visible aperture, trim contours, mounting points, bezel shape, and structural space available for the receiver and installation kit.
The rearward space required by the receiver body plus plugs, bend radius, adapters, and ventilation clearance.
Hardware and programming that translate network messages or factory functions for an aftermarket receiver.
The signal, turn-on, level, channel, and processing match between a new receiver and the original external amplifier.
Compatibility of camera video, reverse trigger, antenna, USB, microphone, illumination, and steering-control connections.
The full space a fixed or floating screen occupies across viewing angles, tilt positions, button access, vents, controls, and occupant movement.
Tip: A fit claim is complete only when the relevant connector, signal format, vehicle state, and physical clearance have been verified.
Dash-kit shape, mounting ears, chassis depth, rear connectors, cable bend radius, internal braces, screen movement, trim removal, and ventilation determine whether the receiver can be secured without pressure or interference.
A compressed harness or blocked vent is a fitment failure even when the bezel looks flush.
Some vehicles provide conventional constant, accessory, ground, and speaker conductors; others derive wake, retained accessory power, illumination, or amplifier commands through networked modules. The factory audio option can change connector pinout and signal level within one model year.
Wire color or plug shape without circuit identity is not evidence of compatibility.
Steering controls, warning tones, hands-free microphones, cameras, parking sensors, climate views, vehicle settings, factory USB ports, and amplified prompts may involve the receiver. Compatible interfaces can retain only the functions specifically supported for that vehicle and radio combination.
A feature that appears on a product list still needs vehicle-specific support and verification.
A connector adapter may not solve differences in camera format or voltage, amplified antenna power, USB extension limits, microphone bias, or trigger logic. Each accessory path requires the correct conversion and a test in its intended state.
Accessory fit follows electrical and protocol behavior, not connector availability alone.
Screen location should preserve sightlines, vents, hazard controls, shifter travel, and other vehicle functions. Controls must be understandable without excessive visual demand, and the assembly must allow later fuse, connector, firmware, and trim service without destructive disassembly.
Fitment closes when the vehicle remains usable and the installation remains serviceable.
Catalog compatibility is essential preparation, but option differences, previous modifications, and physical tolerances still require inspection.
Exact vehicle, trim, audio package, receiver, kit, harness, interface, antenna, and accessory coverage are documented together.
Dry fitting and state-by-state testing confirm alignment, clearance, shutdown, sound, controls, alerts, cameras, microphones, and service access.
Unknown factory wiring, missing retained-function support, incompatible camera or amplifier signals, obstructed controls, or a pinched harness means the plan is incomplete.
Prior dash cutting, water damage, repaired wiring, warning faults, or undocumented modules can invalidate an otherwise correct catalog match.
These myths reduce a layered vehicle integration problem to nominal dimensions or connector appearance.
Nominal face size does not establish chassis depth, bracket position, trim contour, connector clearance, screen sweep, vent access, harness compression, or vehicle integration. The exact receiver and dash kit still need mechanical and functional verification.
A connector can carry network messages, amplifier-level signals, camera power, steering commands, or retained-accessory logic that a passive adapter cannot interpret. Pin identity, signal type, programming, and supported feature coverage determine whether translation is required.
Factory amplifiers may expect particular analog levels, balanced signals, digital data, channel assignments, turn-on logic, or processed bands. Sending an unsuitable speaker or preamp signal can create noise, wrong level, missing frequencies, or no output.
The small chassis can ease rear-space constraints, but the display still needs a clear sweep, stable mount, useful sightline, reachable controls, safe occupant clearance, and access to vents, switches, shifter movement, and adjacent screens.
Tip: Require evidence for the exact car, trim, factory-audio package, receiver, interface, and retained feature before calling the fit complete.
These answers address nominal sizing, factory amplifiers, interfaces, cameras, steering controls, and the checks that complete a fitment decision.
Use model year, make, model, body style, trim, region, production split, factory-audio package, navigation or amplifier option, camera equipment, steering controls, and other receiver-hosted features. Previous modifications also need direct inspection and documentation.
Some applications use the receiver's supplied sleeve or vehicle brackets, while others require a shaped kit for alignment, retention, and trim. Follow the exact application instructions; improvised gaps or unsupported mounting are not acceptable fitment.
Factory cameras can differ in power voltage, grounding, video format, connector, trigger, switching, and dynamic-guideline behavior. The interface must support those characteristics, and the installed image must be tested during the actual reverse or selection state.
Retention depends on vehicle messages, control type, compatible interface, receiver input, programming, button mapping, and firmware. Fit guides may distinguish basic from advanced support, so every intended command needs testing rather than an all-or-nothing assumption.
The unit mounts securely; trim closes naturally; wiring is unstrained; screens and controls clear; power states behave correctly; sound, cameras, microphones, alerts, and retained features work; sightlines remain acceptable; and the assembly can be serviced.
Car stereo head-unit fitment matters because dashboard space, vehicle networks, factory amplification, accessories, retained features, driver interaction, and service access are one installation problem.
Start with the exact vehicle configuration and receiver model, verify each physical and signal interface, then test every affected vehicle state. A flush bezel cannot redeem lost warnings, incompatible signals, obstructed controls, or hidden wiring strain.
These explainers show how the receiver uses its fitted interfaces, why each operating function needs proof, and how the larger audio system constrains the final result.
Follow the power, source, control, audio-output, camera, microphone, and vehicle-interface paths that the fitted receiver must support.
Evaluate receiver capabilities by their required inputs, outputs, limits, and vehicle dependencies instead of by checklist labels.
Compare head-unit fit with the broader amplifier, speaker, wiring, enclosure, power, and cabin-acoustic fit of the complete system.
Choose a retailer
Prices checked regularly. We may earn a commission at no cost to you.